
Creating a table
You can create tables into text elements to help format fields according to your preference. E.g. If you want to place 4 parts of text next to each other, you can do so by creating a table with 4 columns.
- Click on the text box until the text editing toolbar appears.
- Click on the table icon which opens a pop-up window for setting table properties.
- When setting the properties, decide how many columns and rows you want to have in your table.
- Remove table spacing, the sizes of table insides and borders (table will have no borders) as they might influence the design later on. Select 100% as the width of the table.
- Choose how you want to align the table (e.g. in the centre of the template).
- Once you’ve set the properties, click “OK”.
A table, where you can insert your preferred information, will appear inside the text box. You can choose a different text size, color and background color for each of the fields. Use the options on the text editing toolbar to do so.

Adding and deleting rows and columns in the table
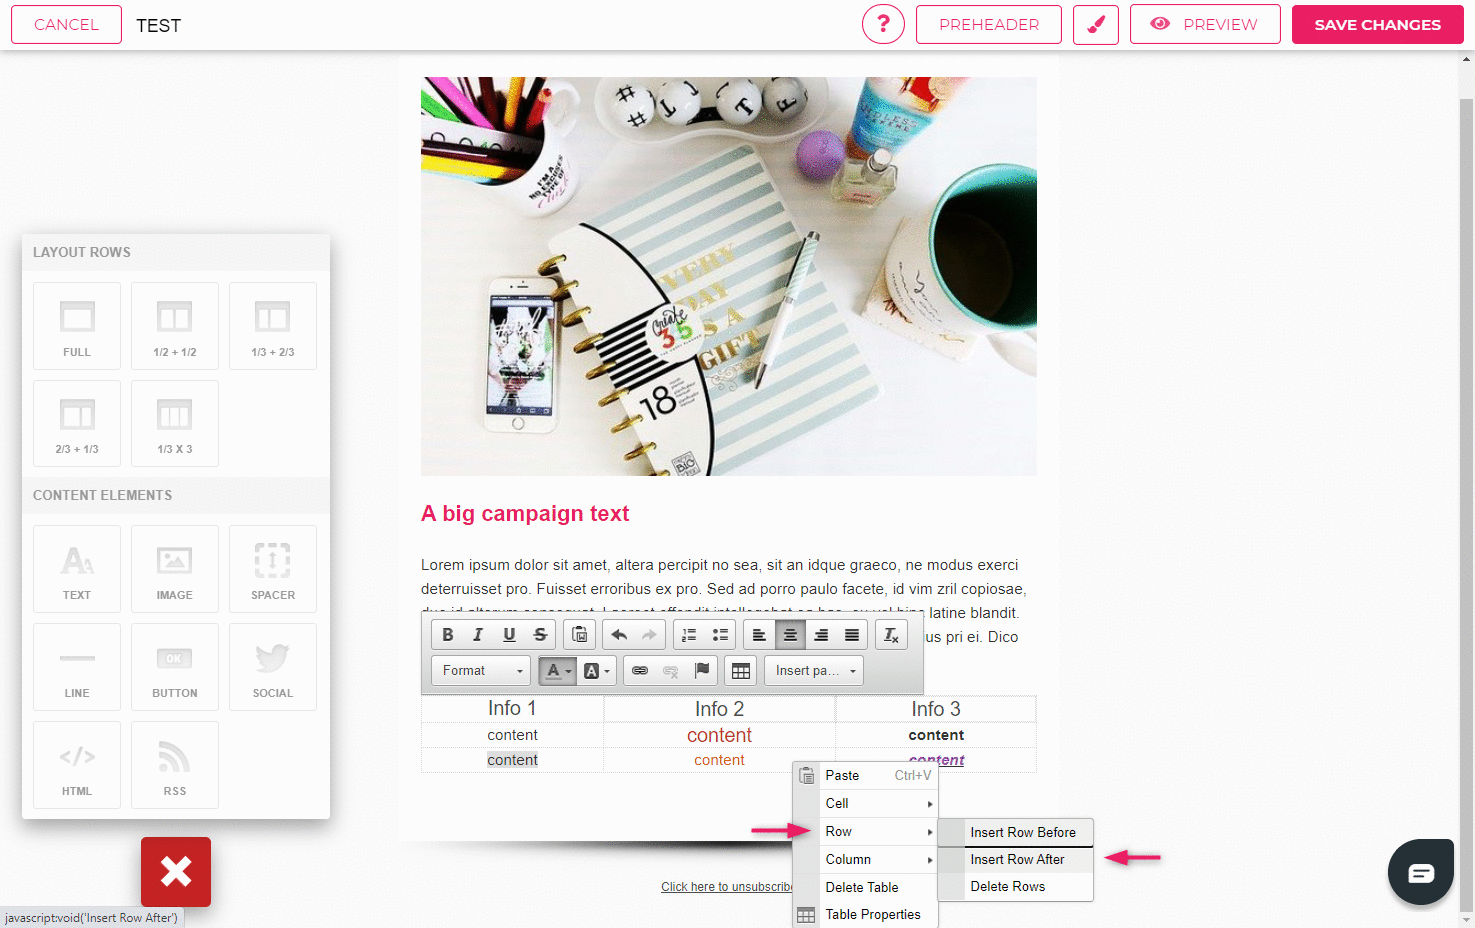
- To add a new row to the table, move the cursor to the row below which you want to add a new row to and right click.
- A dropdown menu with different options will open.
- Choose “Row” and then “Insert row after”.
- A new row will appear under the row on which you right clicked.
If you want to add a new row above a specific row, choose “Insert row before” in the dropdown menu. A new row will appear above the row on which you right clicked.
- To delete a row, right click on the row you want to delete.
- Choose “Row” and then “Delete rows” from the dropdown menu.
- The row on which you double clicked will be deleted.
Deleting and adding fields and columns can be done the same way.
- Right click on the table on your preferred spot and instead of “Row” choose “Field” or “Column” from the dropdown menu.
- From the menu you can choose if you want to insert a new field or column before or after the field on which you right clicked or if you want to delete the field or column.

Different text sizes with the help of a table
Generally you can use only one text format within one text element. This means that all the text within the element is in one format. To use different text formats within one element you have to use tables. You can use different text formats for different fields of the table.
E.g. If you want to write “Price: 50€” and have the number in a bigger size than the word, you have to use a table to achieve that.
- Create a table with one row and two columns.
- The table should be narrow (e.g. 50px) to guarantee that the text will fit next to each other on the template.
- Write “Price:” in one column and “50€” in another. Now you can select different formats for different fields. You can choose between four different styles of text: Normal, Heading 1, Heading 2 and Heading 3. Under “Customize styles” you can choose a different size, font, color etc. for each of the styles.
- To change text size, click on the brush icon in the upper right corner to open the window for style settings.
- Find your preferred format (e.g. Heading 2).
- Update text size.
- Choose the text format you want to display “50€” in (e.g. Heading 2) and it will be updated to your preferred format.
In the final view the table borders will not be displayed.